Introduction:
In this project, I am trying to ensure a direct communication between STM32F4 and Raspberry Pi 2, Those two boards are connected through a serial communication (UART)
which is the process of sending data bit by bit sequentially .
In the meanwhile i will upload the same data to an IOT platform
named “ThingSpeak” using the http
protocol .

Description:
the main task is to collect live data from LDR sensor and send it to thingspeak to be plotted in a graph.
As a start , let’s write a small code on the IAR Embedded Workbench for ARM and
upload it to the STM32F4 board .
EWARM is a development environment that includes a
C/C++ compiler and debugger .

To make the task a bit easier , i’ve
used the STM32cubeMX which is a graphical software configuration tool
that allows generating C initialization code using graphical wizards.

ThingSpeak : a brief definition : how it
works ?

ThingSpeak is an open source Internet of Things (IoT)
application and API to store /share
data sent by a hardware (eg:
Arduino , Raspberry PI ..)
The ThingSpeak™ IoT platform provides apps that let you analyze and
visualize your data using the HTTP protocol over the Internet or via a Local Area
Network.
This
link will help you more : https://thingspeak.com/pages/learn_more
Here is another concept that i’ll be introducing in this paper
which is the HTTP protocol.

HTTP is the protocol used to fetch data from web
servers. It is a very simple protocol that is built upon TCP/IP. The protocol
also allows information to get sent to the server from the client using a few
different methods(verbs) , in
my case i’ve used the POST verb to (write) data in the server.
Curl is a
command line tool for doing all sorts of URL manipulations and transfers, but
this particular document will focus on how to use it when doing HTTP requests
for fun and profit. I've used these command
lines to know more about this tool : 'curl --help' or 'curl --manual' to
get basic information about it.
Universal Synchronous/Asynchronous
Receiver Transmitter:UART
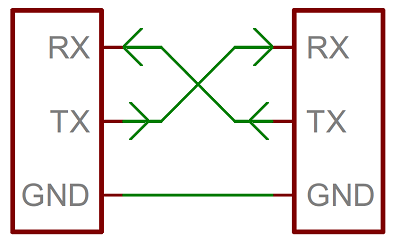
In UART communication, two UARTs communicate
directly with each other. The transmitting UART converts parallel data from a
controlling device like a CPU into serial form, transmits it in serial to the receiving
UART, which then converts the serial data back into parallel data for the
receiving device. Only three wires are needed to transmit data between two
UARTs. Data flows from the Tx pin of the transmitting UART to the Rx pin
of the receiving UART:
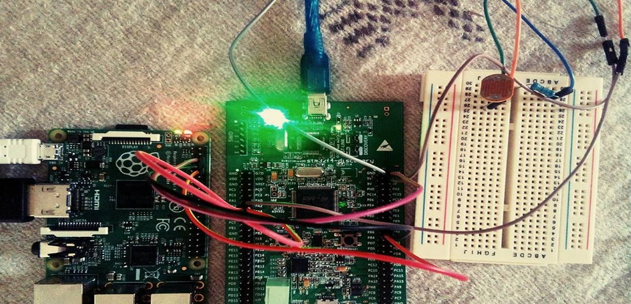
How to connect UART serial Device to raspberry PI GPIO ?
Raspberry Pi board TX, RX pin identification has
shown below. You can use PIN6 as common ground between raspberry Pi and the
STM32.And
you need to follow certain steps in order to enable the serial connection .
Make
a click on this link and be careful with the instructions .

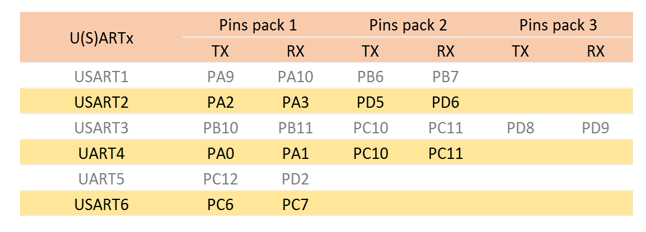
How to connect UART serial Device to STM32F4 pins ?
STM32F4 Discovery board has 6 U(S)ART channels
(USART1, USART2, USART3, UART4, UART5, and USART6). here is a part of the STM32F4 discovery board block diagram.

USART can be used for communication with PC or
another device that use USART communication such as bluetooth module, GSM
module and so much more. USART 1 and USART6 are connected to APB2
bus . USART2, USART3, UART4, UART5 are connected to APB1 bus.
ADC
is stands for Analog to Digital Converter. Microcontrollers are digital
component, so they only understand discrete/digital signals. Therefore if you
want to read analog voltage that can be from various sensors, you need an ADC.
STM32F407
has 3
ADC that can work independently. Every ADC have 18 channels.
16 channels are external and connected to GPIO pin. 2 channels are internal
that connected to internal temperature sensor and ADC voltage reference.
When
you use ADC, you can choose which ADC and its channel from this table:

LDR (Light Dependent Resistor) is
a component that has a (variable) resistance that changes with the light
intensity that falls upon it .the relation between light and resistance is
decribed in the graph below .
Before passing by the coding part ,let’s talk about the whole
process step by step :
- Raspberrypi2 will open the serial port and send a particular message to STM32F4 **The message is “sendthedata” **
- STM32F4 waits for this exact message and prepares its data in a buffer
- Once the STM32F4 has received the message , it will send the light’s level each 15 seconds ,If no message has been transmitted by Rpi nothing will be sent.
- RPi will read this data and upload it immediatly to the platform “ThingSpeak”
The
configuration part under STM32CubeMX:

CubeMX was used mainly to initializing the needed peripherals as ADC 1 and USART 1, also to get the board ready to make such an application by ensuring the clock's configuration throw the HSE.
Also throw CubeMX, we could fix in wich mode exactly our receiving of data must be done (Polling mode, DMA if there is a hardware mapping or a simple UART interrupt).
The input pin of the LDR is going to be as an ADC input connected
to the GPIO pin PA0
of the stm32 board. this one have to be connected or hardware speaking "mapped" to the ADC1 input channel, also it have to be configured as a gpio in analog mode.
You may need to search for the reference manual (RM) and user manual delivered by the ST
Microelectronics to know more about registers , peripherals and the function of
all pins.
An ADC (Analog-to-Digital Converter) is a peripheral that allows measuring the voltage
(between 0 and Vref) on a certain input of the
microcontroller and converting it into a number between 0 and 2N-1 where N is the ADC
resolution
For more details about the STM32’s ADC block , those links can help
you:
The STM32CubeMX is based on the HAL library .HAL
drivers provided from ST for each section.
RCC (Reset and Clock Control)
library is needed to set up clocks for running STM devices at high speed.
For more detailed information look into this link :https://stm32f4-discovery.net/tag/rcc/
After setting up the peripheral , the clock , the adc input pin and
the uart pins on STM32CubeMX let’s run it to generate the C code and all necessary files(drivers.h or
libraries ) and let’s add few lines to
the main function after declaring new variables:
---------------------------------------------------------------------------------- -- Company: -- Engineer: Ibtihel Ben Ali -- -- Create Date: 13:17:33 25/08/2018 -- Design Name: -- Module Name: Cloud_Computing -- Project Name: -- Target Devices: -- Tool versions: -- Description: -- -- Dependencies: -- -- Revision: -- Revision 0.01 - File Created -- Additional Comments: -- ----------------------------------------------------------------------------------*declaring the user variables*/uint8_t data_rx[12];uint8_t ldr_value;uint8_t light;volatile uint16_t adc_value=0;uint8_t data_tx[1];int main(void){HAL_Init();/* Configure the system clock */SystemClock_Config();/* Initialize all configured peripherals */MX_GPIO_Init();MX_ADC1_Init();MX_USART1_UART_Init();/* Infinite loop *//* USER CODE BEGIN WHILE */while (1){HAL_ADC_Start(&hadc1);/*Start the ADC peripheral */HAL_ADC_PollForConversion(&hadc1,100); /*With polling, you're continuously checking to see if conversion is complete */adc_value=HAL_ADC_GetValue(&hadc1); /*returns a value between 0(0 volts )and 4095(5 volts)*/ldr_value=(adc_value*5)/4095; /*convert adc values to voltages **//*add 48 to each value as an ASCII code */light=ldr_value+ '0';data_tx[0]=light;HAL_UART_Receive_IT(&huart1, data_rx, 12); /*transmit the data*/HAL_UART_Transmit_IT(&huart1, data_tx,1);HAL_Delay(15000);}/* USER CODE END 3 */}
In the code above you can look into the delay , that delay wasn’t random .
I can explain more for you :
the platform « thingspeak » that i’m going to send my data to can only upload data every 15 seconds , if you send any other information or try to do some update try to do it like that at 0s 15s 30s 45s etc .. because it will not detect the correct values it can only accept values in this particular timing .So the raspberry PI is only the bridge between STM32 and thingspeak . this delay must be respected by both stm32 and RPI.
The raspberry pi C code : PART1 (opening the serial port)
#include<stdio.h>
#include<unistd.h> //Used for UART
#include<fcntl.h> //Used for UART
#include<termios.h> //Used for UART
#include<string.h>
#include<stdlib.h>
#include<stdint.h>
#include<curl/curl.h>
int main(intargc , char** argv)
{
//Setting Up The UART
//----- SETUP USART 0 -----
//At bootup, pins 14 and 15 arealready set to UART0_TX, UART0_RX respectively
int uart0_filestream = -1;
//OPEN THE UART
//The flags (defined infcntl.h):
//Access modes (use 1 of these):
// O_RDONLY - Open for reading only.
// O_RDWR - Open for reading and writing.
// O_WRONLY - Open for writing only.
//
// O_NDELAY / O_NONBLOCK (same function) - Enables
nonblocking mode. When set read requests on the file can return immediately
with a failure status
After running the code in both sides you will see on the IAR EW
watch option this little table :
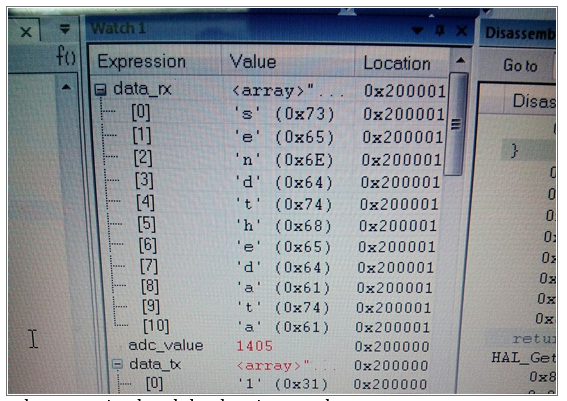
The message have been received and the data is set to be sent
.
PART 3 : receiving the data and uploading it at the
same time
CURL *curl;
CURLcode res;
char url [67] =
"https://api.thingspeak.com/update?api_key=KFLBHCXC9A4J2P2E&field1=";
char rx_buffer[1];
int rx_length = read(uart0_filestream,rx_buffer, 1);
if (uart0_filestream != -1)
{
if (rx_length < 0)
To run the C code on raspberry pi use
this command line gcc –o Project Project.c
–lcurl
This is how my terminal looks like :

PART5 : i have already created an account on thingspeak
now all i have is to prepare my channel and my field for my data :

We are so grateful to our future engineer Ibtihel BEN ALI for such an amazing article.
For more information:
Writer contact beaibtihelbenali@gmail.com
Writer linkedin account https://www.linkedin.com/in/ibtihal-ben-ali-804189148/
Hope you enjoy it : #the_future_is_bright
Our offer is very effective when compared with the listed list. You create a very site and boost your google rankings web site, but this site does not require anyone to use your site. This is the first place for SEO services to allow users to access your site.
RépondreSupprimerLet'S Electronic : Cloud Computing Using Stm32 And Raspberry Pi. >>>>> Download Now
Supprimer>>>>> Download Full
Let'S Electronic : Cloud Computing Using Stm32 And Raspberry Pi. >>>>> Download LINK
>>>>> Download Now
Let'S Electronic : Cloud Computing Using Stm32 And Raspberry Pi. >>>>> Download Full
>>>>> Download LINK mC
Nice blog!!
RépondreSupprimerLed Lights online
Buy Led Home Lights
We provide tech tutorial related to android, windows, ios & Some other cool stuff!
RépondreSupprimerif u went more just: click here!
thank you for sharing this post I am glad to be here and read this inflammation is really awesome
RépondreSupprimerzooqle mirror proxy
eztv mirror proxy
best web proxy sites
skytorrents mirror proxy
RépondreSupprimerPeter Scofield22 juillet 2020 à 11:17
If you need to hire a real hacker to help monitor your spouse's cell phone remotely, contact deadlyhacker01@gmail.com or whatsapp: +1 3478577580. They are very reliable.
If you need to hire a real hacker to help monitor your spouse's cell phone remotely, contact deadlyhacker01@gmail.com or whatsapp: +1 3478577580. They are very reliable.
RépondreSupprimerAre you interested in trading bitcoin binary and forex trade where you can earn 100% of your investment daily If you invest as low as $200 you will get a profit of $2,000 after 72 hours if you are intrested you can contact him via email: hackintechnology@gmail.com +12132951376(WHATSAPP)
RépondreSupprimerLet'S Electronic : Cloud Computing Using Stm32 And Raspberry Pi. >>>>> Download Now
RépondreSupprimer>>>>> Download Full
Let'S Electronic : Cloud Computing Using Stm32 And Raspberry Pi. >>>>> Download LINK
>>>>> Download Now
Let'S Electronic : Cloud Computing Using Stm32 And Raspberry Pi. >>>>> Download Full
>>>>> Download LINK
Hey Friend,
RépondreSupprimerCongratulation to you. I am happy after reading your post that you have posted in this blog. Thanks for this wonderful post and hoping to post more of this. I am looking for your next update.
Thanks a lot!
Straw Making Machine